Back to Contents Page
Battery Latch Assembly
Dell™ Inspiron™ 1525/1526 Service Manual
 Removing the Battery Latch Assembly
Replacing the Battery Latch Assembly
Removing the Battery Latch Assembly

|
CAUTION: Before you begin the following procedure, follow the safety instructions in the Product Information Guide. |
- Follow the instructions in Before You Begin.
- Remove all memory module (see Removing Memory Module).
- Remove the hard drive (see Removing the Hard Drive).
- Remove the optical drive (see Removing the Optical Drive).
- Remove all Mini-Cards (see Removing Mini-Card).
- Remove the center control cover (see Removing the Center Control
Cover).
- Remove the keyboard (see Removing the Keyboard).
- Remove the display assembly (see Removing the Display Assembly).
- Remove the internal card with Bluetooth wireless technology, if installed
(see Removing the Internal Card With Bluetooth® Wireless
Technology).
- Remove the palm rest (see Removing the Palm Rest).
- Remove the ExpressCard cage (see Removing the ExpressCard Cage).
- Remove the processor thermal-cooling assembly (see Removing the
Processor Thermal-Cooling Assembly).
- Remove the processor (see Removing the Processor Module).
- Remove the system board (see Removing the System Board Assembly).
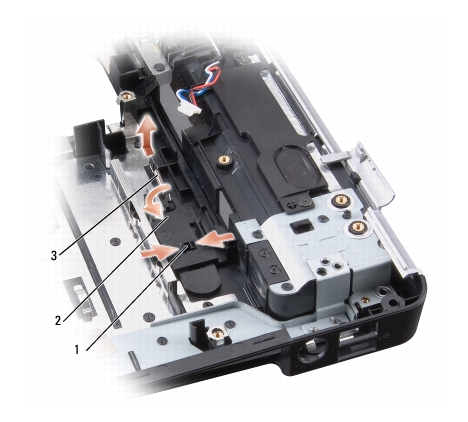
- Squeeze the plastic grip together to release the latch button.
- Carefully pry open the spring.
- Slide the battery latch assembly to the right and remove it.
|
1
|
plastic grip
|
2
|
battery latch assembly
|
|
3
|
spring
|
|
|

|
NOTICE: Before you remove the battery release button, observe the orientation of the button to ensure proper installation when the button is replaced. |
Replacing the Battery Latch Assembly
|
|
CAUTION: Before you begin the following procedure, follow the safety instructions in the Product Information Guide. |
|
|
NOTICE: Ensure the battery latch assembly is properly oriented. The indent for the screw should face up when installing the assembly. |
- Slide the battery latch assembly into place.
- Replace the spring.
- Align the battery release button with the hole in the battery latch
assembly, then press the button into place.
- Follow the steps in Removing the Battery Latch Assembly in the reverse
order.
Back to Contents Page