 Flash Cache Module
Dell™ Inspiron™ 1525/1526 Service Manual

|
CAUTION: Before you begin any of the procedures in this section, follow the safety instructions in the Product Information Guide. |

|
NOTICE: To help prevent damage to the system board, you must remove the battery from the battery bay before you begin working inside the computer. |
If you ordered a wireless Mini-Card with your computer, the card is already installed. Your computer supports three types of wireless Mini-Cards:

|
1 |
cover |
2 |
captive screws (8) |

|
NOTE: The Mini-card may have two or three connectors, depending on the type of card you ordered. |
|
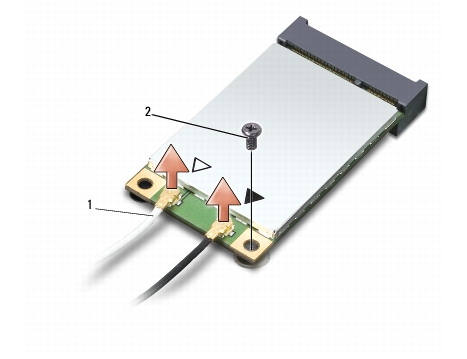
1 |
antenna cable connectors |
2 |
securing screw |
|
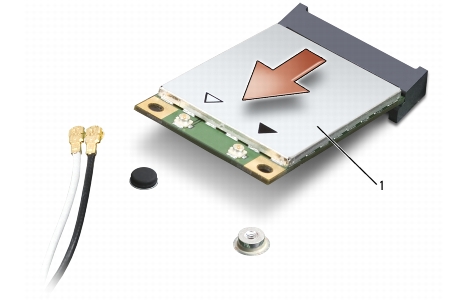
1 |
Mini-card |
|
|
NOTICE: The connectors are keyed to ensure correct insertion. If you feel resistance, check the connectors on the card and on the system board, and realign the card. |
|
|
NOTICE: To avoid damage to the Mini-card, never place cables under the card. |
|
|
NOTE: For more specific information about which cable to connect to which connector, see the documentation that came with your Mini Card. |
|
|
NOTE: If you leave the area, ground yourself again when you return to the computer. |
|
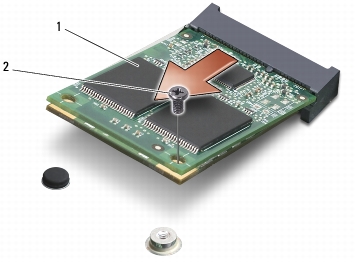
1 |
FCM Card |
2 |
M2 x 3-mm securing screw |
|
|
NOTICE: Install the FCM in the WWAN slot. Do not install an FCM in the WLAN card slot. Doing so may cause damage to your computer. |