Back to Contents Page

Keyboard

Dell™ Inspiron™ 1525/1526 Service Manual


CAUTION: Before you begin any of the procedures in this section, follow the safety instructions in the Product Information Guide.
NOTICE: To avoid electrostatic discharge, ground yourself by using a wrist grounding strap or by periodically touching an unpainted metal surface (such as a connector on the back of the computer).
NOTICE: To help prevent damage to the system board, you must remove the battery from the battery bay before you begin working inside the computer.

Removing the Keyboard

  1. Follow the procedures in Before You Begin.

  2. Remove the center control cover (see Removing the Center Control Cover).

  3. Remove the two screws at the top of the keyboard.

NOTICE: The key caps on the keyboard are fragile, easily dislodged, and time-consuming to replace. Be careful when removing and handling the keyboard.
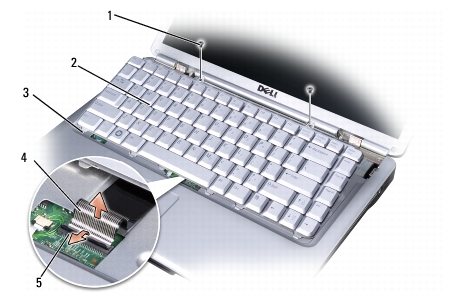
  1. Lift the keyboard and hold it up and slightly forward to access to the keyboard connector.

  2. To disconnect the keyboard cable from the keyboard connector on the system board, rotate the keyboard connector latch toward the front of the computer.

  3. Slide the keyboard cable out of the keyboard connector.

1

screws (2)

2

keyboard

3

keyboard tabs (5)

4

keyboard cable

5

keyboard connector latch


Replacing the Keyboard

  1. Slide the keyboard cable into the keyboard connector.

  2. Rotate the keyboard connector latch to secure the cable.

  3. Align the tabs along the bottom of the keyboard and slide them under the palm rest.

  4. Press on the right edge near the top to snap the keyboard into place.

  5. Replace the two screws on the top of the keyboard.


Back to Contents Page